User interface
Main areas
The Capturebox user interface consists of the following main areas:

Figure: Capturebox user interface main areas
(1) - Menu/toolbar
(2) - Media overview
(3) - Ingest channel 1
(4) - Ingest channel 2
(5) - Messages
(6) - File preview
(7) - Status bar
Notice
All windows of the Capturebox user interface can be freely positioned by docking or undocking. The figure used here shows a possible arrangement of the elements with two ingest channels. Capturebox supports up to 16 ingest channels.
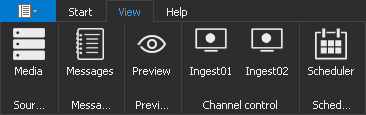
Menu bar
The menu bar of the main window contains the following sections:
-
Start

-
View
-
Help
Notice
The expanded toolbar is collapsed by double-clicking on the menu bar. Clicking again on an area of the menu bar expands the toolbar again. Alternatively, the toolbar can generally be expanded and collapsed by clicking on an area in the menu bar.
The areas of the menu bar provide access to the following functions:
| Area | Symbol | Function |
|---|---|---|
| Start | Properties | Open the Capturebox system settings menu Warning Incorrect configuration can lead to system failures. The settings should therefore only be changed by trained personnel. |
| Exit | Close the Capturebox application | |
| View | Media | Show/hide the Media overview window |
| Messages | Show/hide the Messages window | |
| Preview | Show/hide the File preview window | |
| Ingest01 | Show/hide the window for ingest channel 01 | |
| Ingest02 | Show/hide the window for ingest channel 02 | |
| Scheduler | Show/hide the Scheduler window (without function) | |
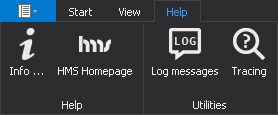
| Help | Info | Show information about the Capturebox application |
| HMS Homepage | Open the Qvest Stream website | |
| Log messages | Enable/disable log messages | |
| Tracing | Enable/disable tracing Notice The Tracing function is used for event monitoring and error analysis and should only be used by trained personnel. |
Media overview
The Media overview lists all files recorded with Capturebox (all files from monitored source directories).
If the Media overview window is not yet displayed, it can be enabled in the toolbar via View > Media. Afterwards the corresponding icon is highlighted in blue:

Figure: Media overview window enabled
Here you can see an exemplary general view of the Media overview:
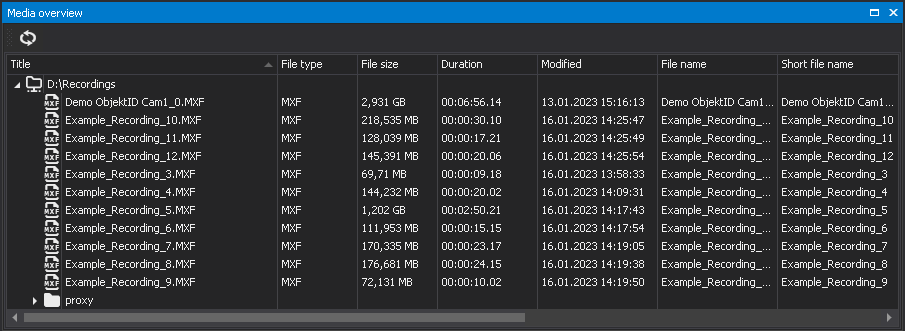
Figure: Media overview
For more information about the Media overview, see chapter Media management.
Ingest channel
To manage ingest jobs, a separate window is available for each configured ingest channel.
If the window of an ingest channel is not yet displayed, it can be enabled in the toolbar via View > [Name of ingest channel]. Afterwards the corresponding icon is highlighted in blue:
Figure: Ingest channel windows enabled
Here you can see an exemplary representation of an Ingest channel window:
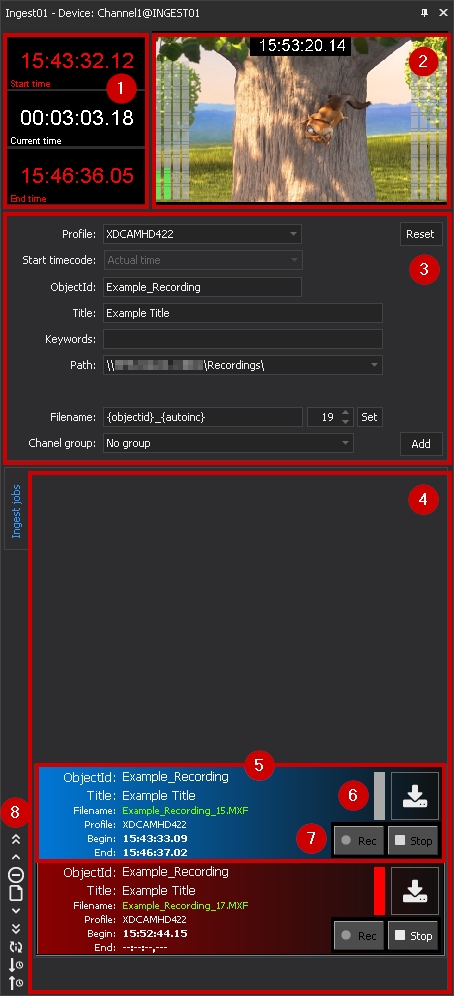
Figure: Ingest channel window
The ingest channel window consists of the following elements:
| No. | Element | Function | Description |
|---|---|---|---|
| 1 | Time information | Time displays for the currently selected ingest job | The start and end time as well as the current position (recording duration) of the selected job are displayed here. |
| 2 | Video preview | Video preview of the source signal of the ingest channel incl. audio level display (VU meter) and time code display | The video display can be activated and deactivated by double-clicking in this area. Alternatively, you can also open the context menu by right-clicking and selecting Enable/Disable Preview. Notice By default, the video preview displays the current system time as timecode. If necessary, the timecode display can be disabled in the Capturebox system settings. Notice The audio output is disabled by default. To enable it, open the context menu via right-click and select Sound on. To disable the audio output, select Sound off. |
| 3 | Ingest job settings | Quick menu for creating new ingest jobs | For more information, see Ingest job settings (quick menu). |
| 4 | Ingest job list | List of all current jobs of the ingest channel | - |
| 5 | Ingest job | Single ingest job with job information | For more information, see Ingest job. |
| 6 | Ingest job status | Display of the job status and the job mode | For more information, see Ingest job. |
| 7 | Ingest job control | Ingest job control | For more information, see Ingest job control. |
| 8 | Ingest job list editing | Toolbar for editing the ingest job list | For more information, see Ingest job list editing. |
Ingest job settings (quick menu)
This area is used to quickly create ingest jobs without having to open a separate menu. For this purpose, only basic settings of the ingest job must be specified.
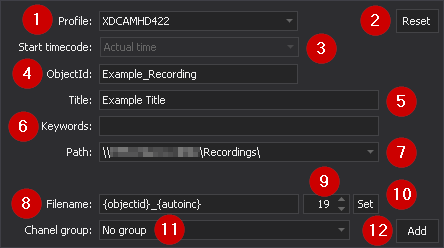
Figure: Ingest job settings (quick menu)
Notice
This menu can only be used to create ingest jobs for crash recordings.
Capturebox also provides a separate menu with advanced ingest job settings. This can be used to create ingest jobs for crash recordings as well as for scheduled recordings.
You can find a comparison of the different job types in chapter media recording overview.
The area includes the following elements:
| No. | Element | Function | Description |
|---|---|---|---|
| 1 | Profile | Select recording profile | Here you select the recording profile to be used. This contains specifications which file format and parameters to be used for a recording. |
| 2 | Reset | Reset inputs | Via this button you can reset the properties of the ingest job to the default values. |
| 3 | Start timecode | Set timecode | This field displays the type of timecode that is stored as the start timecode ("timecode of first frame") in the metadata of the file to be recorded. The default setting is Actual time, i.e. the current system time is used as timecode. Notice All files recorded by Capturebox are recorded with this timecode variant by default, if the used file format supports it. |
| 4 | ObjectId | Enter ObjectId | The ObjectId is stored as a metadata element of the file to be recorded (see Sidecar XML file). Notice If you leave the field empty, Capturebox generates the value automatically according to the current configuration. A default value can be defined for this in the Capturebox system settings. |
| 5 | Title | Enter the job title | The title of the job is saved as a metadata element of the file to be recorded (see Sidecar XML file). Notice If you leave the field empty, Capturebox generates the value automatically according to the current configuration. A default value can be defined for this in the Capturebox system settings. |
| 6 | Keywords | Enter keywords | Keywords can, for example, contain descriptive information about a recording and can be evaluated by downstream systems. They are stored as a metadata element of the file to be recorded (see Sidecar XML file). |
| 7 | Path | Enter target directory | Specify the target directory where to save the file to be recorded. |
| 8 | Filename | Enter file name for recording | Enter the file name to be used for the recorded file. This can be created or extended both manually and by variables. Notice If you leave the field empty, Capturebox generates the value automatically according to the current configuration. A default value can be defined for this in the Capturebox system settings. |
| 9 | "Auto increment" counter | Select the current value of the "Auto increment" counter | This is a counter that applies across all ingest channels. This value is used when the variable {autoinc} is used in the file name and a new ingest job is created. The variable is replaced by the current value of the counter.Notice When a new ingest job is created, the value of the counter is automatically increased by 1. This prevents already recorded files from being overwritten due to an identically chosen file name in a new ingest job. Tip You can also change the value of the counter manually, either by entering the corresponding number directly via the keyboard or by using the arrow keys in the counter field. To save the changed value, click Set. The new value will then be applied to all ingest channels. |
| 10 | Set | Save current value of the "Auto increment" counter | This button allows you to save the value of the counter after a manual change. Tip To retrieve the currently saved value after manually changing the value (without having saved it in the meantime), open the context menu by right-clicking on Set and select Retrieve counter reading. |
| 11 | Channel group | Select ingest channel group | See Group recording. |
| 12 | Add | Create ingest job | This button allows you to add an ingest job to the job list using the selected properties. |
Notice
For each recorded file, a sidecar XML file is created in the target directory with additional metadata that can be used by downstream systems. This is usually structured as follows (example):
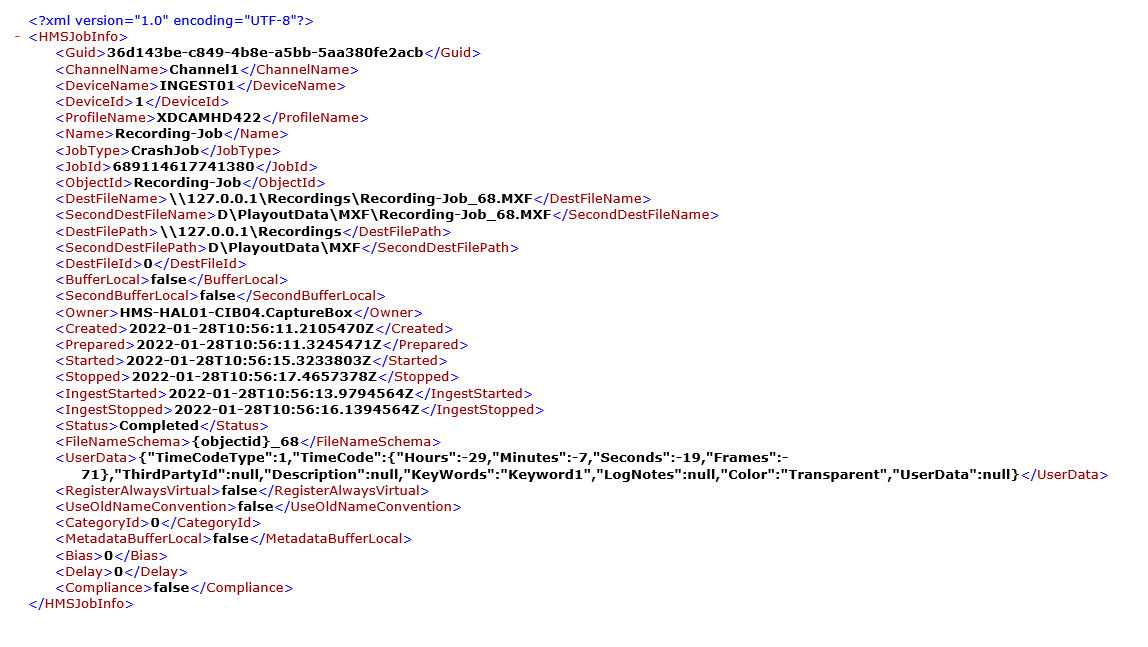
Figure: Sidecar XML file
Ingest job control
The ingest job control allows you to manually control ingest jobs.
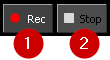
Figure: Ingest job control
It provides the following functions:
| No. | Symbol | Function |
|---|---|---|
| 1 | Rec | Start recording |
| 2 | Stop | Stop recording |
Notice
In case of a crash recording both buttons are available and you can use them to start and stop the recording manually.
If the recording job is a scheduled recording, the recording will start automatically at the selected time. For this reason, the only button available to you in this case is (2) Stop, which you can use to end the recording manually.
Ingest job
In the ingest job list, the type of each ingest job can be recognized by a corresponding symbol. The following symbols are used here:
![]() Crash recording
Crash recording
![]() Scheduled recording
Scheduled recording
The current job status can be recognized by the colored marker.
After an ingest job has been created and the recording is ready to be started, it is highlighted in green:
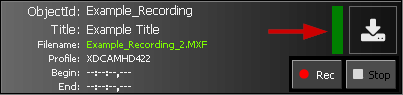
Figure: Crash recording (status: ready/green)
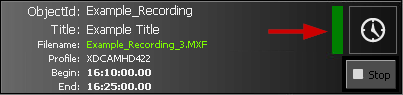
Figure: Scheduled recording (status: ready/green)
A started ingest job is highlighted in red:
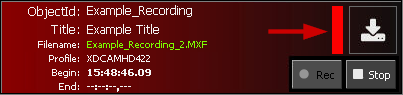
Figure: Crash recording (status: started/red)
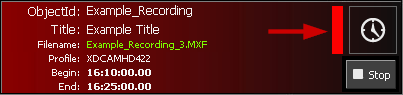
Figure: Scheduled recording (status: started/red)
After an ingest job is completed, it is highlighted in gray and the recorded file is listed in the specified directory in the Media overview:

Figure: Crash recording (status: completed/gray)
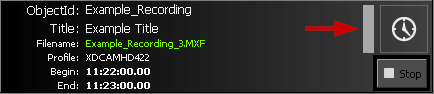
Figure: Scheduled recording (status: completed/gray)
Ingest job list editing
Via the ingest job list editing toolbar you can edit the list of ingest jobs.

Figure: Ingest job list editing toolbar
It provides the following functions:
| No. | Symbol | Function |
|---|---|---|
| 1 |  | Move selected job up to the top of the list |
| 2 |  | Move selected job one position up |
| 3 |  | Remove selected job from list |
| 4 |  | Create new job (open advanced ingest job settings) |
| 5 |  | Move selected job one position down |
| 6 |  | Move selected job down to the end of the list |
| 7 |  | Synchronize job list manually with the associated IngestServer |
| 8 |  | Sort job list in ascending order by job title |
| 9 |  | Sort job list in descending order by job title |
Ingest job settings (advanced menu)
In addition to the ingest job settings quick menu, you can also create ingest jobs using the advanced ingest job settings. This menu provides additional settings and you can use it to create ingest jobs for both crash and scheduled recordings.
To open the advanced ingest job settings, click the Create new job icon in the ingest job list editing toolbar.
The Ingest job properties window is displayed.
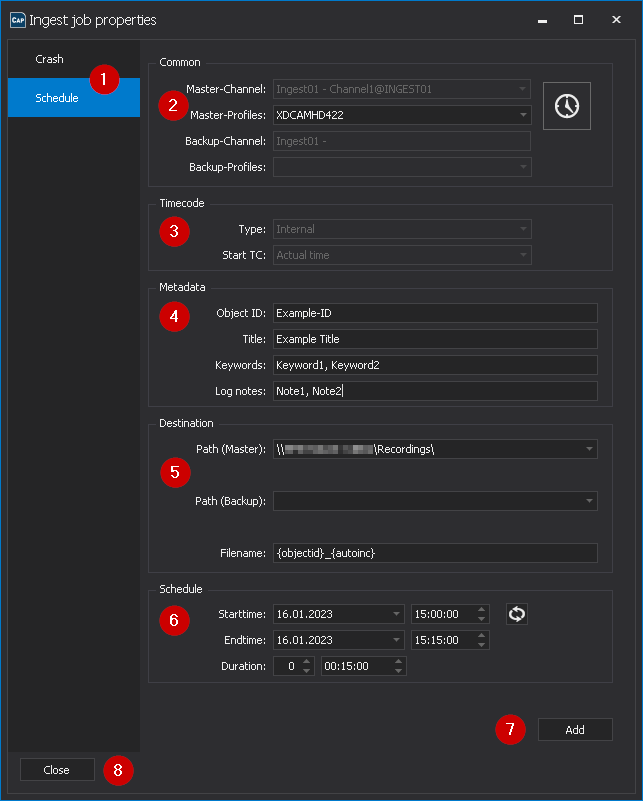
Figure: Ingest job properties window
The advanced ingest job settings enable you to set the following properties:
| No. | Area | Property | Description |
|---|---|---|---|
| 1 | - | Job type | The job type to be used for recording. Available job types are Crash and Schedule. |
| 2 | Common | Master channel (not editable) | The primary ingest channel to be used for recording. |
| Master profile (not editable) | The recording profile to be used for recording via the primary ingest channel. | ||
| Backup channel (not editable) | The secondary ingest channel to be used for recording (without function). | ||
| Backup profile (not editable) | The recording profile to be used for recording via the secondary ingest channel (without function). | ||
| 3 | Timecode | Type (not editable) | The type (source) of the timecode to be used. |
| Start TC (not editable) | This field displays the type of timecode that is stored as the start timecode ("timecode of first frame") in the metadata of the file to be recorded. The default option is "Actual time", i.e. the current system time is used as timecode. | ||
| 4 | Metadata | Object ID | The ObjectId is stored as a metadata element of the file to be recorded (see Sidecar XML file). Notice If you leave the field empty, Capturebox generates the value automatically according to the current configuration. A default value can be defined for this in the Capturebox system settings. |
| Object title | The job title is stored as a metadata element of the file to be recorded (see Sidecar XML file). Notice If you leave the field empty, Capturebox generates the value automatically according to the current configuration. A default value can be defined for this in the Capturebox system settings. | ||
| Keywords | Keywords can contain, for example, descriptive information about a recording and can be used by downstream systems. They are stored as a metadata element of the file to be recorded (see Sidecar XML file). | ||
| Notes | Notes can contain, for example, descriptive information about a recording and can be used by downstream systems. They are stored as a metadata element of the file to be recorded (see Sidecar XML file). | ||
| 5 | Destination | Path (Master) | The target directory to be used for recording via the primary ingest channel. |
| Path (Backup) | The target directory to be used for recording via the secondary ingest channel (without function). | ||
| Filename | The file name to be used for the recording. Variables are also supported here to automatically generate the file name or to extend it. Notice If you leave the field empty, Capturebox generates the value automatically according to the current configuration. A default value can be defined for this in the Capturebox system settings. | ||
| 6 | Schedule | Start time | Date and time for the start of the recording. Notice This area is only available for scheduled jobs, i.e. when "Schedule" is selected as the type under (1). |
| End time | Date and time for the end of the recording. | ||
| Duration | Duration of the recording. As an alternative to a manual entry in the End Time field, you can enter the duration of the job to be created in days (left field) as well as hours, minutes, and seconds (right field). The values displayed under End time will adjust according to your entries. Tip You can reset the time data to the default values via the | ||
| 7 | - | Add | Create the ingest job using the selected properties. |
| 8 | - | Close | Close the Job Properties window. |
Variables
To automatically generate filenames of recorded files according to your specifications, you can use variables in the filename field. This is possible both in the ingest job settings quick menu and in the advanced ingest job settings. When creating an ingest job, the used variables are replaced by actual values.
Tip
Example:
Suppose you use an ingest profile with MXF as container format for your ingest jobs and you want the file names of your recordings to be composed as follows:
- the current date
- a static identifier (e.g. "example_recording")
- a consecutive number
In this case, you could enter the following value in the Filename field:
{yyyy}-{mm}-{dd}_example_recording_{autoinc}
If the auto-increment counter was set to 10, an ingest job created on 03/23/2022 would create a file with the following filename:
2022-03-23_example_recording_10.MXF
The following variables are available for this purpose:
| Variable | Meaning |
|---|---|
| {d} | Day (1-31) |
| {dd} | Day (01-31) |
| {ddd} | Day short form |
| {dddd} | Day |
| {M} | Month (1-12) |
| {MM} | Month (01-12) |
| {MMM} | Month short form |
| {MMMM} | Month |
| {y} | Year (0-99) |
| {yy} | Year (00-99) |
| {yyy} | Year short form |
| {yyyy} | Year |
| {h} | Hour (1-12) |
| {hh} | Hour (01-12) |
| {H} | Hour (0-23) |
| {HH} | Hour (00-23) |
| {m} | Minute (0-59) |
| {mm} | Minute (00-59) |
| {s} | Second (0-59) |
| {ss} | Second (00-59) |
| {f} | Tenth of a second |
| {ff} | Hundredth of a second |
| {fff} | Millisecond |
| {ffff} | Thousandth of a second |
| {fffff} | One hundred thousandth of a second |
| {ffffff} | Millionth of a second |
| {fffffff} | Ten-millionth of a second |
| {K} | Time zone difference local time to world time |
| {t} | AM/PM identifier short form |
| {tt} | AM/PM identifier |
| {g} | Epoch/period |
| {cw} | Calendar week |
| {doy} | Day of the year |
| {z} | Time zone hour difference (without leading zeros) |
| {zz} | Time zone hour difference two digits |
| {zzz} | Time zone hour and minute |
| {vfn} | File name |
| {iprofile} | Ingest profile name |
| {ichannel} | Ingest channel name |
| {ititle} | Ingest title |
| {objectid} | Object ID |
| {autoinc} | Auto increment |
Messages
The Messages window contains status messages that are marked with corresponding icons and colors depending on their type and meaning. If the Messages window is not yet displayed, it can be enabled in the menu bar via View > Messages. Afterwards the corresponding icon is highlighted in blue:

Figure: Messages window enabled
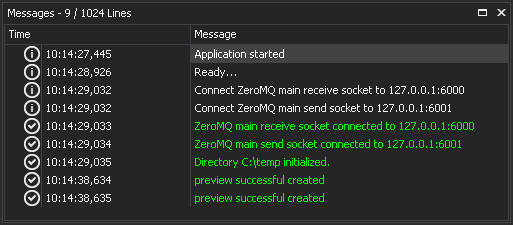
Figure: Messages window
File preview
Overview
The File preview enables frame-accurate preview playback of recorded files. Files to be previewed can be selected via the Media window.
Notice
The File preview in Capturebox provides basic functions for previewing recorded files. For advanced functions (such as trimming files or creating subclips), use the separate File preview in Clipbox.
If the File Preview window is not yet displayed, it can be enabled in the menu bar via View > Preview. Afterwards the corresponding icon is highlighted in blue:

Figure: File preview window enabled
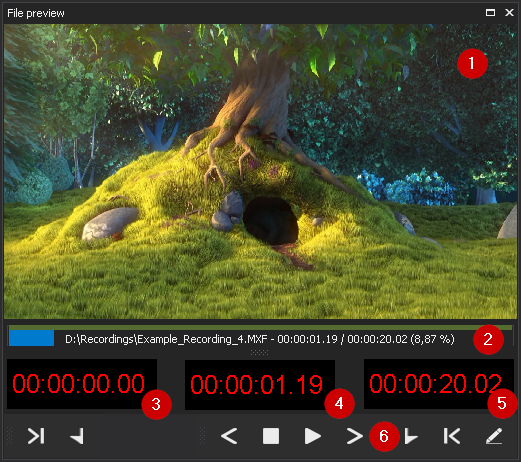
Figure: File preview window
The File Preview window consists of the following elements:
| No. | Element | Function |
|---|---|---|
| 1 | Preview | Preview image of the current playback position of the selected file |
| 2 | Timeline | Timeline with file and playback information (file path and name, current time index, total duration, progress) Tip You can also use the Timeline to jump to any position within a file by clicking on the corresponding position. |
| 3 | Start of material | Currently set mark in time code (without function) |
| 4 | Position | Current playback position |
| 5 | End of material | Currently set mark out time code (without function) |
| 6 | Toolbar | File preview control toolbar |
Toolbar
The File preview toolbar provides access to the following functions:

Figure: File preview toolbar
| No. | Symbol | Function |
|---|---|---|
| 1 |  | Jump to mark in |
| 2 |  | Set mark in |
| 3 |  | Previous frame |
| 4 |  | Stop |
| 5 |   | Play/Pause |
| 6 |  | Next frame |
| 7 |  | Set mark out |
| 8 |  | Jump to mark out |
| 9 |  | Save mark in and mark out points (without function) |
| 10 |  | Update the length/duration of the file being played Notice This function is only available if the currently playing file is a growing file (e.g. a file that is currently still being recorded). |
Customizing the user interface
Capturebox provides the possibility to customize the arrangement of the user interface windows. The main areas can be placed almost arbitrarily.
Changing the arrangement of windows
To change the arrangement of a window, proceed as follows:
-
Click the title bar of the window you want to move.
-
Hold down the left mouse button and move the window to the desired position.
Notice
The user interface provides you with possible positions for docking windows on the screen (top, bottom, left or right). If you move the selected window within an open window, an additional icon appears at the positions where you can dock it.
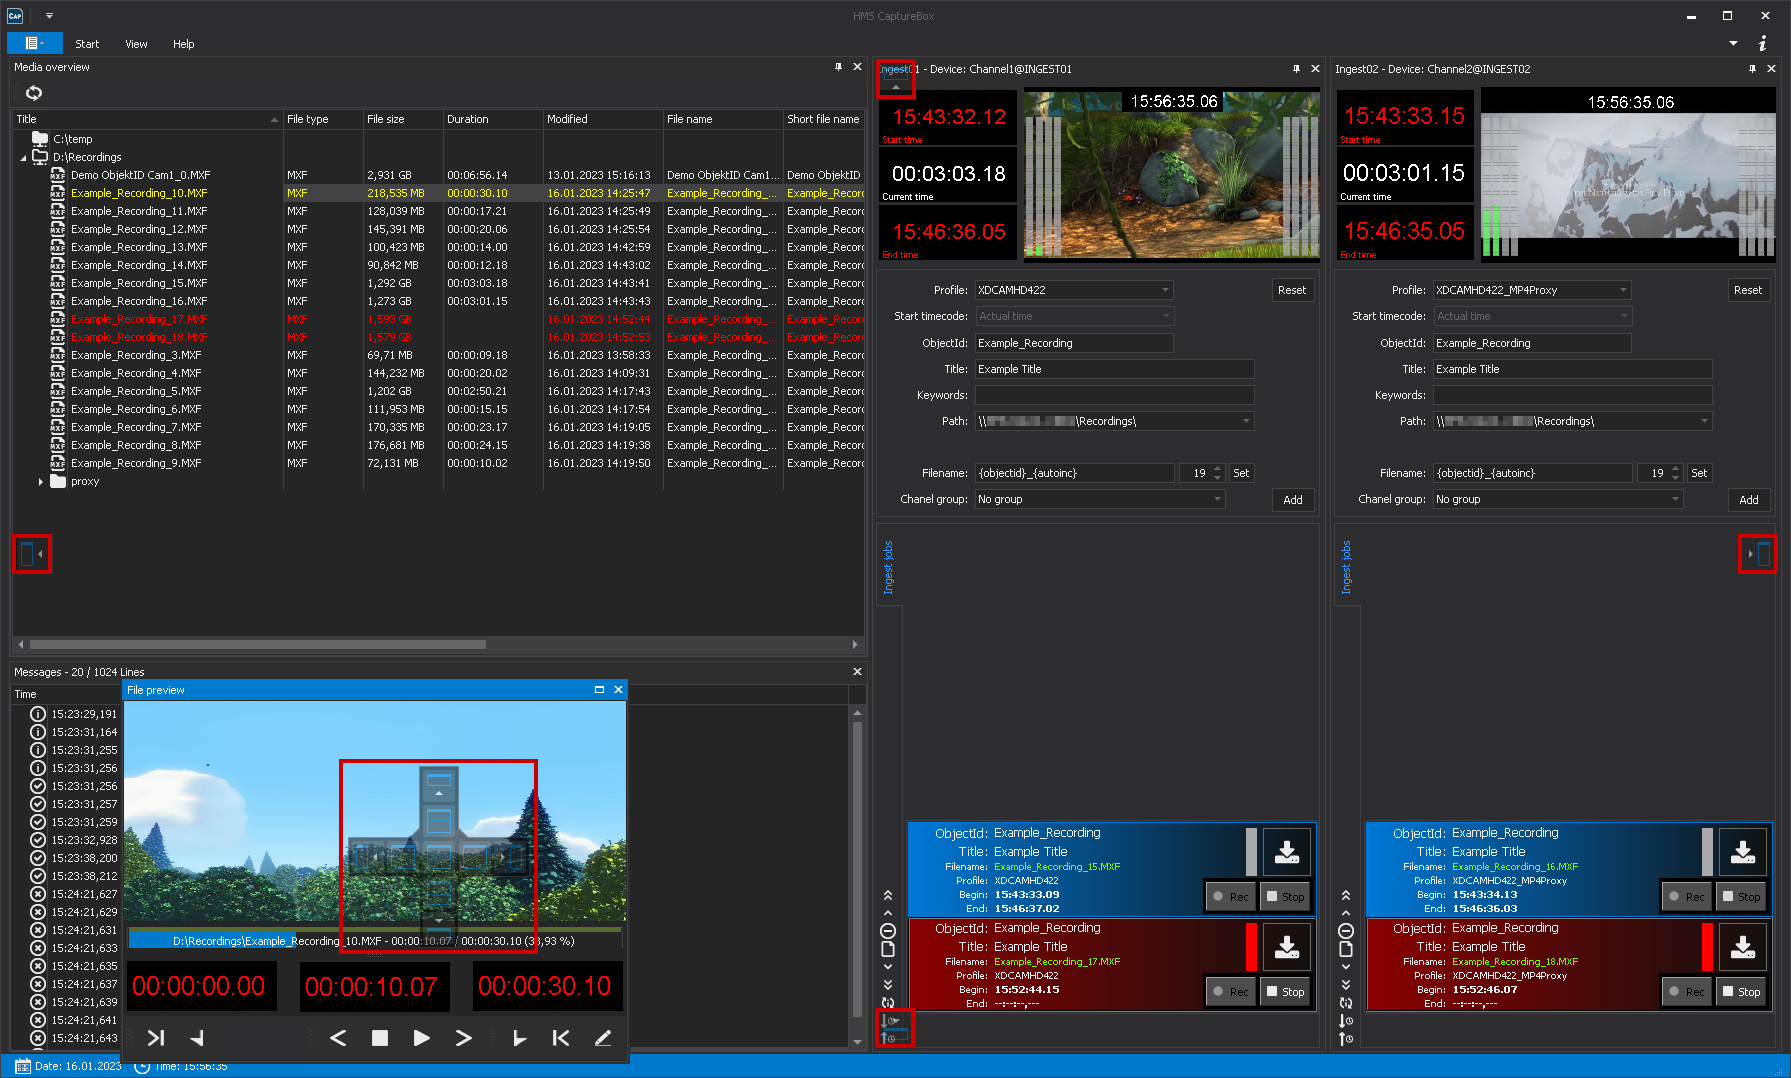
Figure: Move windows of the user interface
To dock a window at a suggested position, proceed as follows:
-
Click the title bar of the window with the left mouse button.
-
Drag the window to the desired position while holding down the left mouse button.
The corresponding position is highlighted in blue as a preview.
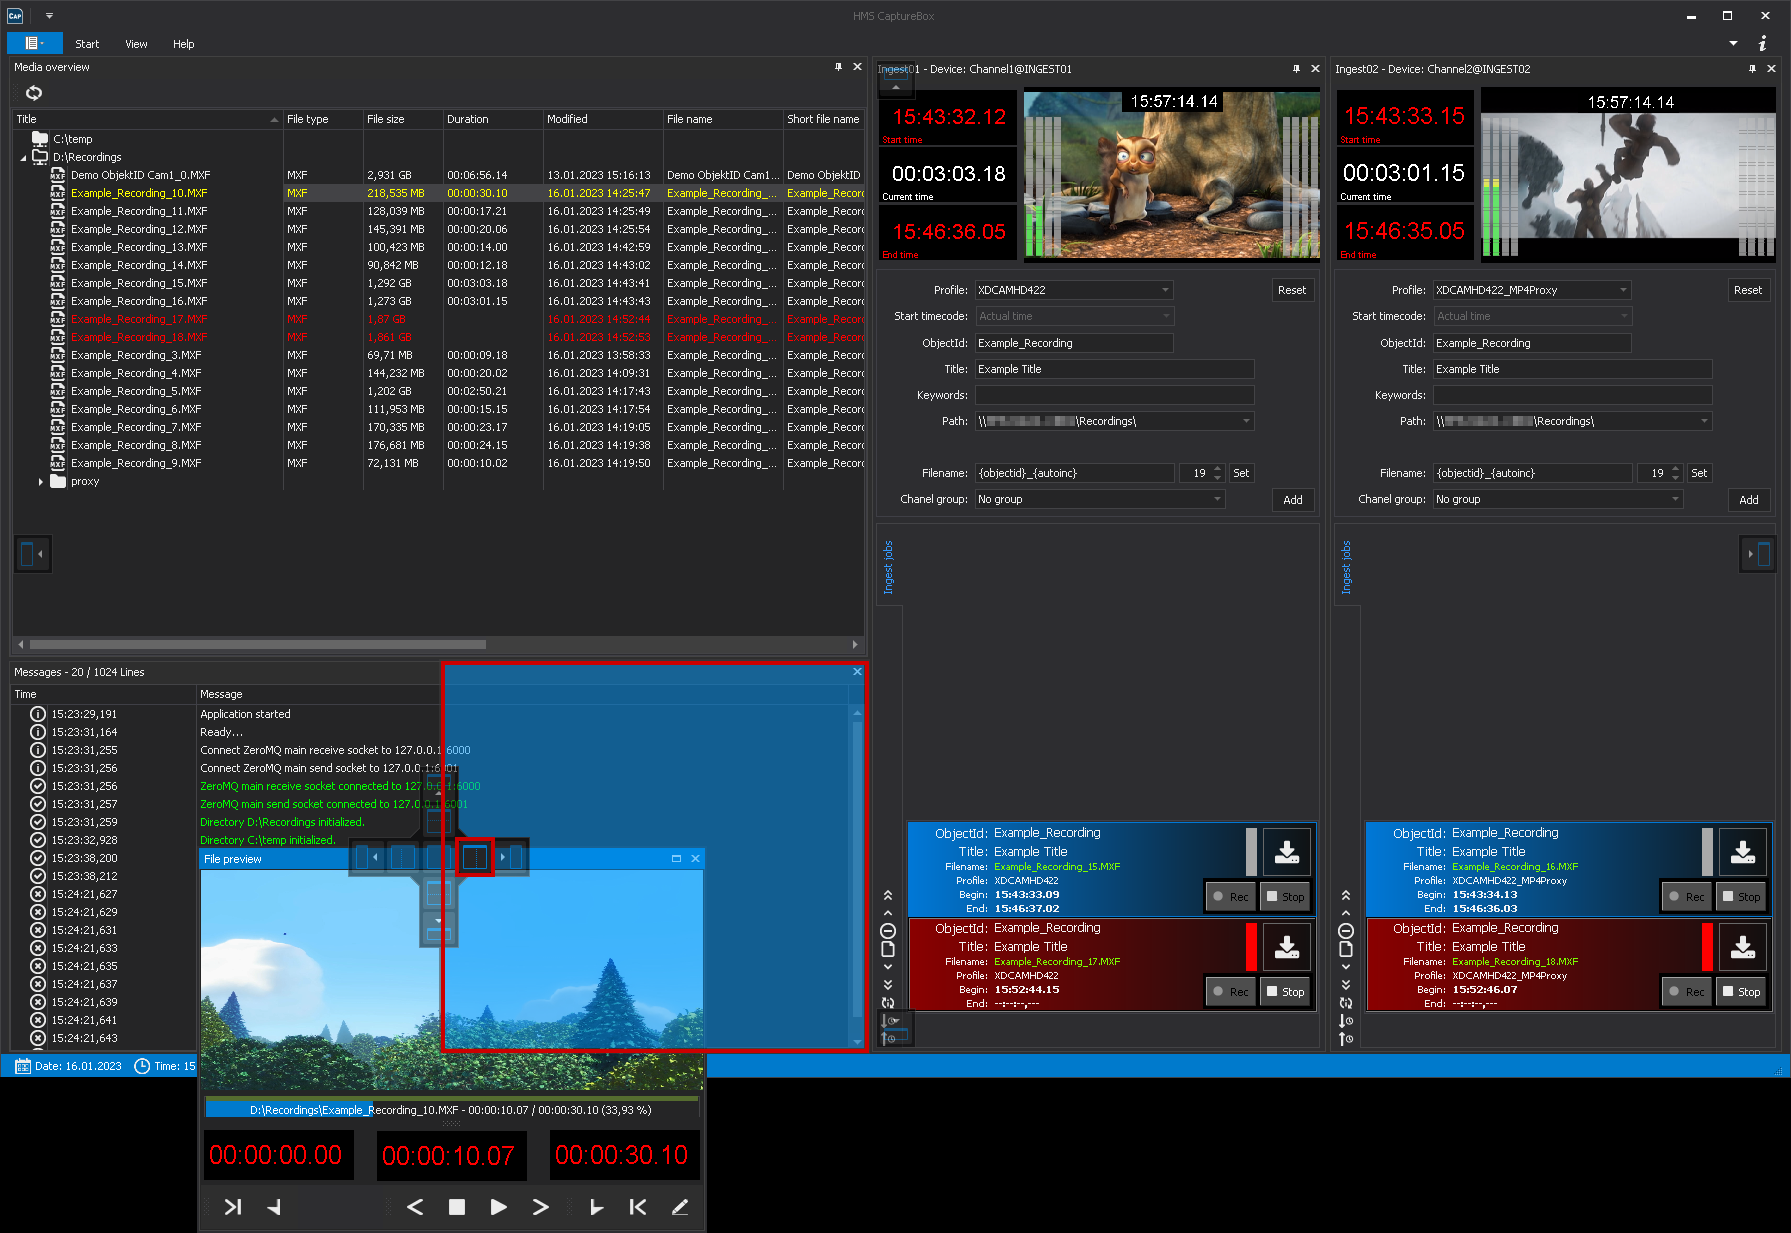
Figure: Dock window at new position
To undock a docked window, proceed as follows:
-
Double-click the title bar of the respective window.
The window is no longer docked and is displayed separately.
Tip
To dock the window back at its original position, double-click again.
Combining multiple windows
Multiple windows can be combined in one window and displayed via a tab bar. To do this, at least one window must already be open.
Proceed as follows to create a tab bar in a window:
-
Open another window via the toolbar.
-
Drag it to the center of the already opened window.
The position selection for docking windows (see below) appears.
-
Select the position in the center.
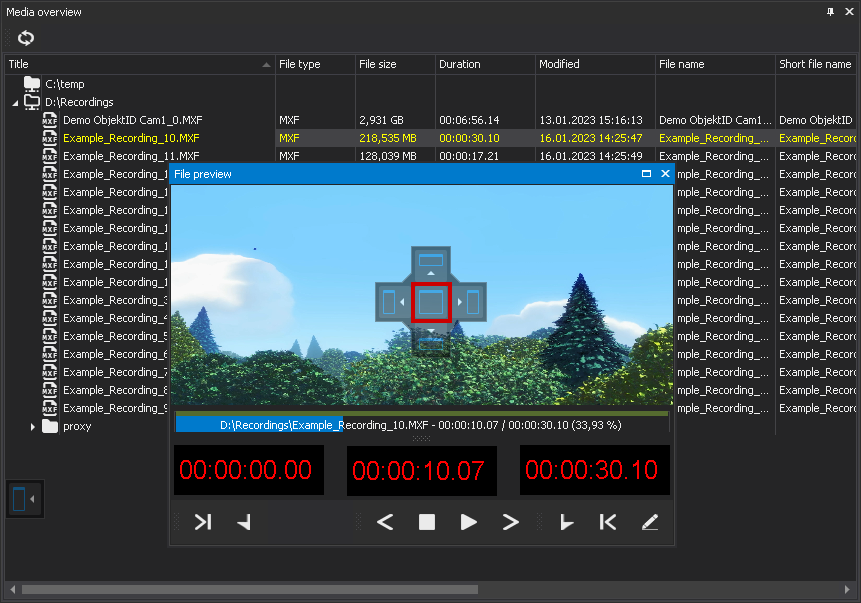
Figure: Dock window centrally
Both windows (in the example the "File Preview" and "Media Overview" windows) are displayed in the tab bar at the bottom and can be selected via this.
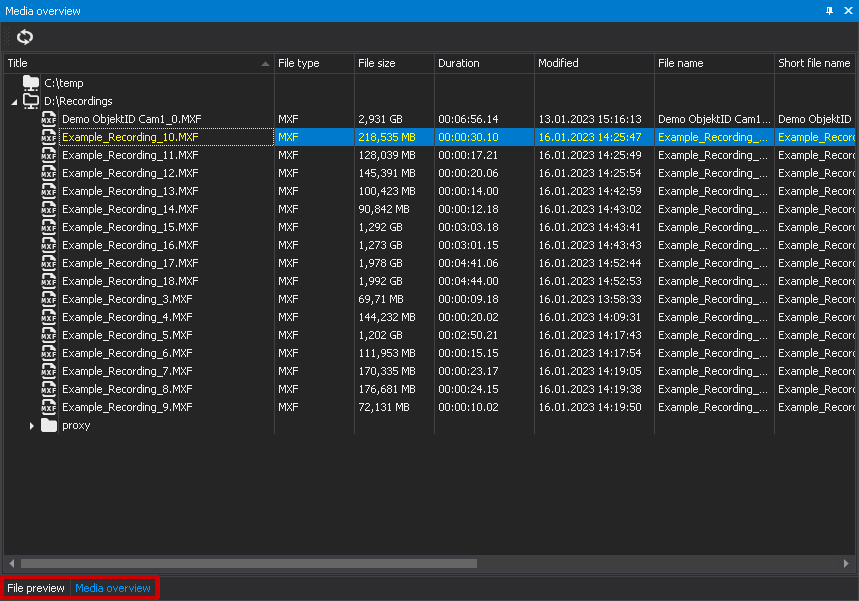
Figure: Window docked and added to tab bar
Tip
Any number of windows can be added to a tab bar.